Writer | Math |
Impress | Calc |
Draw | Base
LibreOffice was a fork of OpenOffice.org. The latter now exists
as Apache OpenOffice. Unfortunately efforts are
divided between the two projects.
(The original project had to be be referred to as OpenOffice.org,
used as an adjective, because the name OpenOffice itself was owned by
someone else.)
The native file format is a zip’d collection
of files with the main content stored as XML.
A possible alternative to LO/AOO is the
Calligra suite,
a descendent of KDE’s KOffice. As of 2019 Jun 14,
there still is no real integration of Zotero
with Calligra Words, but
RTF/ODF-Scan for Zotero is a Zotero add-on that provides
an awkward work-around (requiring the presence of LO).
Resources
My notes
General preferences
- Automatic updating.
As of version 24.8, automatic updating is turned on by default,
at least under MS Windows
(release notes).
This means that an update, which can be somewhat
time-consuming and which may introduce unexpected behaviour,
might happen when it’s not convenient.
Automatic updating can be disabled at
.
Styles |
Spacing |
Numbering |
Images |
Fonts |
Customizing |
Text replacement |
Citations & references |
RevealCodes
- Automatic backup.
Do
and check the box .
This is turned off by default.
- Styles.
Use styles instead of direct formatting,
especially paragraph, character and page styles.
- To understand the hierarchical arrangement of paragraph styles,
in the dialogue window
()
select
in the drop-down menu
at the bottom. Every style inherits attributes from the
, including the
style and all of its descendents.
- Use the
paragraph style
rather than the parent
style.
By default the style
will automatically be specified for text following a heading style.
- For headings use the styles ,
, etc. Don’t use
the parent style directly,
and don’t use direct formatting.
- If (against all advice) you’re playing with text colour using
the font-colour attribute directly, if you want to set the colour
back to the default black, set it to ,
not to .
Similarly, to remove a highlight colour, select
rather than setting it to
.
- Wiebe van der Worp’s explanation of
styles for master documents
- Vertical and horizontal spacing
- Do not use strings of Return characters
to space down the page in order to start a new page.
Instead, insert a manual page break
().
- Do not use extra Return characters
to create blank lines between paragraphs,
nor to create double line spacing.
Instead, use paragraph-style settings to define
the vertical spacing above and below paragraphs,
and the desired line spacing.
- Do not use multiple Space or Tab characters
to position things horizontally on the page. There are better
alternatives, depending on what you’re trying to do.
For example:
- To position things like the date or signature in a letter,
adjust the tab settings.
- To position an image, right-click on it and use
or
.
- To indent a paragraph, use the Indent setting in an
appropriate paragraph style.
- Numbering
- Chapter numbering vs. list numbering.
Chapter (or outline) numbering is different from list numbering,
and the two should not be mixed within a single paragraph.
For chapter and section numbering, use
.
For list numbering, use
.
The bullet and numbering icons
 that appear in the toolbar by default
are for list numbering.
Another icon
that appear in the toolbar by default
are for list numbering.
Another icon
 exists for outline numbering and can be made visible
by customizing the toolbar.
exists for outline numbering and can be made visible
by customizing the toolbar.
- Chapter (outline) numbering
- The following are instructions for setting up
chapter and section numbering
for one particular common numbering scheme.
The instructions are a confused mixture
of chapter numbering and list numbering.
- In ,
under
- Set your chapter title to
Heading 1 style.
- Click somewhere in the chapter title and then do
.
(This isn’t necessary if you haven’t
already set up some numbering.)
- Do .
- Select the tab and then select
the box with
1, 1.1,
1.1.1, etc.
- Select the tab
Under select
For specify
0.
For leave it as
(I don’t actually know what it does)
For select
For
specify 0
- Select the tab
Under select
Under and
, make sure it’s empty
(with no space character)
Under and
, make sure it’s empty
(with no space character)
Under select
Under and
specify
Chapter
(with a space character at the end)
Under and
specify . (period)
- Click OK
- Use of the styles
Heading 1,
Heading 2
etc. will result in the headings showing up in a
table of contents (ToC).
To make some other style show up in a ToC,
edit the style: in the
tab, choose which the
style should have in the ToC.
(There are related settings in ,
under
in the tab, and in the
tab, but I don’t understand
how the whole thing works.)
- List numbering.
See
Configure spacing between list elements for a user’s
discussion of using the various
List and Numbering
paragraph styles for bulleted and numbered lists, respectively.
- Headers & footers.
The sum of the page ,
the footer and
the footer should equal
the distance that you want
between the bottom of your main text and the bottom of the page.
For example, if your page
was 2 cm before adding
a footer, then change it to 0.5 cm and
set the footer and
to 1 cm and 0.5 cm,
respectively.
- Page numbering.
- To add a page number to a page, enable footers in the appropriate
page style for the page.
Click within the footer,
and do .
- To have roman numerals for the first pages in a document,
do to open
the dialogue box, select the
tab, right-click on
and
select . Create a new style called
Front Matter. On the
tab, in the section,
for select
.
Set up a footer for the page style, and click
to exit from the dialogue.
(Page styles do not inherit attributes
from a ‘parent’ style the way paragraph styles do.
You will therefore need to ensure that the settings
(margins, page number position etc.)
are the same in your new style as in the
.
- Large documents often have 3 types of
page numbering: no numbering on the first (title) page,
Roman numerals for the front matter, and
Arabic numerals for the rest. You can set this up as follows:
-
Figure and formula numbering by chapter.
If you create separate documents for chapters and then combine them,
you may end up with your figures and formulas being all numbered in
one sequence rather than restarting from 1 for each chapter.
One way (not necessarily the right way) of fixing it for the
formulas, for example, is to select the number of the first formula
in a chapter and go to .
In the dialogue box that comes up, change
from
Text + 1 to just 1 and click on
. Hopefully that formula will now be number 1
and the numbers of the following formulas will
be incremented appropriately.
- Figure and formula numbering out of order.
Sometimes figure numbering will get mixed up if you move figures around,
so the figures are no longer numbered in the order in which they appear.
Doing
may correct the numbering. This is sometimes necessary even if
is already selected under
at
.
- Images
- Captions.
To add a figure caption that will stay attached to the figure,
first add the figure itself
(),
then right-click on the figure and do
.
The default sequence names that are
offered for numbering are
Drawing and Illustration.
To add Figure as a possible sequence name, go to
; highlight one of the items
under
and make sure its checkbox is checked;
under , highlight
one of the existing sequence names and replace it with Figure;
click on . If you don’t really want AutoCaption,
go back in and turn it off. These instructions are based on
Adding captions to graphics. I’m not actually clear about
some of the interactions.
A caption usually includes a ‘title’ part that concisely
states what the figure shows (not a complete sentence), possibly
followed by non-sentence descriptions of different panels in
the figure and of the meanings of label abbreviations, colours, arrows,
etc., possibly followed in turn by explanatory sentences.
To generate a Table of Figures, do
.
There are a number of options in the tab.
Under ,
for you will probably want
(or in some versions?).
There does not seem to be a way to follow the common practice
of having only the
‘title’ part of each caption included in the
Table of Figures
(ref).
One could select under
, and then in the Navigator tool
rename the Images, but the names would need to include
manually inserted figure numbers.
- Image positioning.
In a large document with many images, image positioning may become
difficult to control, and images may even disappear sometimes,
seemingly randomly. It is important to understand how images
are anchored. Here are some references:
Some highlights:
- Usually use
Anchor to paragraph
(or Anchor to character?)
and try to keep the image close to its anchor.
Usually don’t anchor more than one image to a single anchor.
- If the image is within a caption frame, use
Anchor to frame for the image and then use
Anchor to paragraph
(or Anchor to character?)
for the frame.
- If an image seems to disappear from within its caption frame,
sometimes saving and re-opening the document will be enough
to make it reappear. Sometimes, shifting things around may
also cause it to reappear.
-
Anchor to page was removed from its old
places in the interface at some point (version 7.1?)
because many users misunderstood how it worked
and there are usually better ways of doing things.
Toolbars and context menus can be customized to make it available
again. See this
bug report for a long and lively discussion of page anchors
and of the frustrations of image positioning in general.
- Image as background.
Rather than just inserting an image and doing
, use a page style
and specify .
For a full-page
image, set the and
to zero.
- Fonts.
- Typography.
See
Typography toolbar extension for fancy typographic features
(small caps and much more)
using the Graphite fonts Linux Libertine G and Linux Biolinum G,
but not OpenType fonts.
See this old
discussion (2015 May 7) of the state of
OpenType support in libre software.
There is a longstanding
bug
related to handling fonts that have more than the 4
standard styles (regular, bold, italic, and bold italic);
see also related
e-mail discussion.
- Font substitution
Font substitution is sometimes required because the font
being used doesn’t contain a requested glyph.
There doesn’t seem to be an easy way to determine which font
is being used when font substitution is done.
One method is to export the document as PDF and then
view it with an appropriate PDF viewer/editor.
LibreOffice Draw can be used for the purpose.
(SumatraPDF can show which fonts are used in a document but not
which font is used for a particular character.)
Under MS Windows, the substitution rules are in
c:/Program Files/LibreOffice/share/registry/main.xcd
under <node oor:name="FontSubstitutions">.
By default, LO seems to use Segoe fonts for substitution.
- Embedding fonts in PDF files.
If you need to have your fonts embedded when exporting
in PDF format,
do
and check the
checkbox.
- Special characters.
Special characters can be inserted using
(or the icon
 )
but it can be tedious to find a particular character. If you
know the Unicode value, you can enter it in the
field or the
field within the
dialogue box.
You can also directly insert a character
into a document by typing the character’s Unicode value
(e.g.,
)
but it can be tedious to find a particular character. If you
know the Unicode value, you can enter it in the
field or the
field within the
dialogue box.
You can also directly insert a character
into a document by typing the character’s Unicode value
(e.g., U+AE, not case-sensitive)
and then typing Alt-X. Alt-X can also
be used at any time to view the Unicode value of the character
before the cursor.
Autocorrect can be used for inserting
special characters.
See below for information about
a custom macro for inserting
special characters, and about
special characters for formatting.
- Autocorrect.
Some text replacements
(e.g., ‘--’ giving ‘–’)
are defined by default and can
be enables or disabled in .
To define a text replacement to insert a special character,
enter the special character in a document; highlight it;
go to ,
where the special character should already
appear in the field;
in the field enter the characters
that should generate the special character;
click on .
Note that it doesn’t work to use, for example,
‘e'’ to enter ‘é’
if the ‘'’ character is converted to a curly quotation
mark as specified in .
In any case, using AutoCorrect for accented characters doesn’t
really work well because there needs to be a space character
preceding the specified keystrokes (presumably because the
feature is designed to autocorrect words).
is another possibility
but doesn’t seem to work well either.
If Autocorrect functions don’t work, make sure the language is
set correctly
(cf.
Autocorrect not working).
In one case, I saw that the language for
a paragraph was set to [None].
- Replying to own comment.
The option isn’t available
for your own comment, but with the cursor inside the comment
you can do
to get the same effect.
- Paragraph spacing at top of page.
If a paragraph style is defined as having space above it, normally
this space is unwanted if the paragraph is at the top of a page.
By default, Writer adds the unwanted space at the top of the first
page, for compatibility with MS Word.
To avoid this, do and uncheck
(in current document).
- Selecting large amounts of text.
To easily select a large amount of text that spans page breaks,
use the quick-select feature: position the cursor by clicking
at one end
of the text to be selected, then scroll to the other end of the text
to be selected and press Shift before clicking to reposition
the cursor. The entire area between the first cursor position and
the second cursor will be selected. (I don’t know where this is
documented, I found it in an unrelated posting somewhere.)
Alternatively, use the Extended Selection mode:
position the cursor by clicking at one end
of the text to be selected, then press F8 to enter
extended-selection mode (STD becomes EXT
in the status bar), then scroll to the other end of the text
to be selected and click to reposition the cursor; press
F8 again to get back to the standard selection mode,
otherwise selection doesn’t seem to work at all.
(This use of the F8 key for selection works differently
than what I remember from WordPerfect.) One can also switch
into extended-selection mode by clicking on STD in
the status bar.
- Occasional copy-paste problem.
Occasionally, in MS Windows,
copying and then pasting into a Writer document
will cause a previous clipboard entry to be pasted.
One fix seems to be to click somewhere and copy nothing,
and then do the desired copy and paste again
(ref).
- Document comparison.
When document A is open and
then is
used to compare it with document B, the changes
are recorded with the assumption that document B
is the older version. That is, text in A is shown
as inserted and text from B is shown
as deleted.
- Customizing menus.
Do and select
tab. To add a submenu to a menu,
use the dropdown list to select
the menu to which you want to add the submenu, then click on the
button and select
. In the pop-up
dialogue, specify the name for the new submenu. To then
add items to the submenu, you must select it from the
dropdown list; if it doesn’t
appear there, you may need to exit from the
dialogue and then enter it again.
If you want to add functions defined in a macro, click on the
dropdown list and select
(near the bottom).
- Custom icons.
Here are icons that I created for
 and
and
 because at one time none were provided.
To install such icons, use the
function as described under
Choosing icons for toolbar commands in the chapter
on ‘Customizing Writer’
in the
Writer Guide.
because at one time none were provided.
To install such icons, use the
function as described under
Choosing icons for toolbar commands in the chapter
on ‘Customizing Writer’
in the
Writer Guide.
- Endnotes.
To put endnotes elsewhere than at the very end of a document,
search for, e.g., ‘endnotes placement’ at
OpenOffice.org Knowledgebase (Answer #383); key is to
use sections.
- Offline help.
In LibreOffice,
leads to on-line help by default. An optional download is offered
for off-line help. For it to work, make sure that the user-interface
language () matches
the language of the downloaded off-line help. In my case at least,
the default user-interface language was
English (USA)
but the help-package language was English (UK).
- Expert Configuration.
As of version 4.2, LO has an
button in the dialogue box at
(ref).
The button leads
to a window with thousands of editable items, with a search feature
as of LO 5.0. I don’t know where or if they’re documented.
The only ones whose functions I know are:
- the
Preview property
of /org.openoffice.Office.Common/StylesAndFormatting –
changing it from true to false
(by double-clicking, or by clicking on )
turns off the
new-fangled space-gobbling previewing of styles
(ref).
This applies to the
dialogue box
()
and not to the drop-down
menu in the Formatting toolbar.
- the
UseSystemFileDialog property of
/org.openoffice.Office.Common/Misc –
select between the operating system’s dialog style or
LO’s built-in dialog style for file opening and saving.
(This used to be available directly under
. There seems to be a move away from
having a built-in dialog style.)
- Insert text before table at start of document
If a document is created that starts with a table, it will then appear
impossible to position the cursor so as to add text before that table.
The trick is to put the cursor at the beginning of the top-left cell
and press Enter (e.g., ref).
For some reason this inserts an empty paragraph before the table
rather than in the cell.
Use of Alt-Enter will also work,
and is required for entering text before a section.
See Shortcut Keys for LibreOffice Writer.
- Experimental features.
In LO some features are labelled as ‘experimental’.
In LO 3 they can be enabled in
.
Starting with LO 4 they can be enabled in
, and there is also a setting
to enable limited macro recording.
To find out what such features exist, in
a posting on 2011 Sep 12 it was suggested that one could
search the code for IsExperimentalMode.
As of 2020 Oct 24, for LO 7.0, the search yields things related to
Basic IDE options;
database migration and the Firebird database engine;
the notebook bar;
XML export;
jumbo sheets[?];
the template manager;
file versions;
legacy addons;
in-line editing (math? fields?);
bookmarks;
and other stuff I understand even less.
The experimental mode has been implicated
in a failure to return to the
previous location when re-opening a document
(ref, 2012 Apr 15); and
in LO 3.5 something experimental appears to cause a problem with Zotero
(ref,
2012 Mar 7–13).
- Recent documents.
There is no built-in way to manipulate the list.
Apparently the
HistoryManager extension can be used.
Alternatively one could perhaps try to manually edit
the
Common.xcu file.
If one does
and
searches for , many items
are displayed, including the items that are currently contained
in the recent-documents list; presumably they can be edited,
taking care not to make the HistoryItem and
HistoryOrder lists inconsistent.
To change the number of items kept in the list, one can change the
value associated with the PickListSize property of
the /org.openoffice.Office.Common/History preference.
- Reading XML.
If a
.od* file is unzip’d,
the main content is found in the file
content.xml.
It is also possible to store a document in a
‘Flat XML ODF’ format (.fod*) format.
By default,
the XML has no line breaks so it is very hard to read.
This can be changed by doing
and toggling the PrettyPrinting property of
org.openoffice.Office.Common ► Save ► Common
(just search for pretty) from
false to true.
Two other methods of indenting it: (1) use
the xmllint command from the libxml2 package;
(2) use Benjamin Ferrari’s
bf-pretty-print-xml-region Emacs function.
I’ve included the latter in my
Emacs customizations
as fun-xml-indent.
The command-line utility odt2txt
pulls plain text out of .od* files,
which may be useful for subsequent grep’ing, for example.
The recoll
full-text search package also handles .od* files.
- Citations and reference lists.
Writer includes
basic bibliographic support, but the use of
Zotero is much preferable.
- Immediately after a Zotero citation is inserted, the cursor
is positioned at the end of the citation and one can enter
new text without disturbing the citation field. Later, however,
if one positions the cursor just after the citation and types
something, the new text will be included in the citation field,
which is always a bad idea. The only work-around that I know
of is to type the Enter key, enter some new text,
and then delete the paragraph break that was just created.
- RevealCodes.
This is a feature that WordPerfect has
and that all right-thinking people wish that OO/LO Writer had.
It is not true that OO/LO’s emphasis on styles makes
RevealCodes impossible to implement, and it is also not true
that using styles makes RevealCodes useless.
Some links:
-
Reveal Codes macro - feedback required:
an OOo forum thread started
by Iannz in 2004, looking for feedback on some macros that
he was developing to prototype a RevealCodes-like function.
Last post by Iannz dated 2007 Sep 13.
-
Iannz OpenOffice.org page contained links to versions
1,
2 and
3;
latest version 2004 Nov 12.
There is also a
revised version
dated 2022 Mar 21 by Andrew Pitonyak
(discussed in this
AOO e-mail list thread).
-
Working with properties: Wiki page started by Iannz on
2006 May 2, presenting revised routines from his RevealCodes
macro and a main routine demonstrating their use. There was
an edit by TJFrazier on 2009 Sep 1 to ‘fix several errors’.
In trying the routines I discovered a bug due to a change
in the API in OOo version 3.1 (Issue
103670).
-
Extensions development basic: Wiki page started by Iannz on
2006 Apr 4, as a beginner’s guide for writing macros
in OOo Basic. Numerous revisions by others, most recently
(as of 2016 Feb 6) on 2013 Feb 1.
- OpenOffice
Issue 3395 requesting RevealCodes function,
started 2002 Mar 7; as of 2019 Jul 5, the issue has
202 votes and 164 comments; on 2016 Feb 1 the status was changed
to ‘Issue to Resolved - Won't Fix’.
LibreOffice
issue 34002 was started 2011 Feb 7.
As of 2022 Mar 22, the issue was last modified on 2021 Sep 16,
by someone adding themselves to the CC list.
- Spelling dictionaries.
Spelling dictionaries are provided for various languages.
The ones currently installed can be seen by looking for
languages with a check-mark in the
drop-down list in the tab
in the paragraph-style dialogue.
Dictionaries can be obtained as
LO extensions
and as OO extensions, which at least for the most part are mutually compatible.
By default, all words for which the user does
go into
standard.dic,
regardless of language. Dictionaries can be added and managed at
.
A user’s custom dictionaries are kept in the same directory
as standard.dic.
In OOo < 2.0.3 the locations for spelling dictionaries
could be seen and changed at
.
The dictionaries for various languages were found at ooo/
on the Writing aids path (normally
Program Files/OpenOffice.org 2.0/share/dict/ooo/)
as .dic (words) and .aff (rules) files
(cf.
Hacking OpenOffice.org dictionaries).
Another dictionary called standard.dic was on the
User-defined dictionaries path (normally
in Documents and Settings\username\Application Data\OpenOffice.org2\user\wordbook)
and was generally used to specify
specialized terminology by right-clicking on a mis-spelled
word and doing .
(I preferred to have my personal dictionary
in my home directory, and not called standard.dic,
to make it easier to move among computers.
One had to exit from the Quickstarter and restart OOo for
external changes of dictionary names and paths to be picked up.)
There were also two weird little
dictionaries on the Dictionaries path,
soffice.dic and sun.dic,
for historical reasons;
they could be disabled by unchecking them in
. Additional user-defined
dictionaries could also be created (and edited)
in the same dialogue box.
In version 2.0.3 the paths discussed above disappeared
from the dialogue; from 2.0.4
there was a new configuration
file, paths.xcu, where paths that were not
in the dialogue box
can be changed (cf.
1, 2).
In OOo 3 under Windows, paths.xcu is at
c:/Program Files/OpenOffice.org 3/Basis/share/registry/data/org/openoffice/Office/
In LO 3.5 under Linux the user’s standard.dic is in
~/.config/libreoffice/3/user/wordbook/.
(Prior to 3.5 it was in ~/.libreoffice/3/user/wordbook/.)
Built-in dictionaries are in
/usr/lib/libreoffice/share/wordbook/.
In LO 4.3 under MS Windows, standard.dic and
any other user-defined dictionaries are in
c:\Users\username\AppData\Roaming\LibreOffice\4\user\wordbook\. Built-in dictionaries are in
c:/Program Files (x86)/LibreOffice 4/share/wordbook.
Dictionaries installed as extensions are in
c:/Program Files (x86)/LibreOffice 4/share/extensions.
For LO 4.3 (but not for AOO 4.1) the path for dictionaries
is specified in
. Paths can
be added and managed, facilitating the sharing of
dictionaries among computers. (This is a feature that was
lost in OOo 2.0.3. I don’t know the details of its restoration.)
- Removing line breaks.
When passages of plain text
are pasted into a document,
there will often be spurious hard-return characters
(↵)
and/or paragraph endings (¶). To find and replace these,
do the following in the
dialogue box:
- click on
- select
- in the field
put
\n (for hard returns) or
$ (for paragraph endings)
- in the field
put a space character
- do and
alternately,
or if you’re brave
Related things that you may want to find are tabs (use \t)
and beginnings of paragraphs (use, e.g., ^.).
Regular expressions can do much more than this; see the documentation.
- Removing hard returns 2.
An alternative approach is to
- go to
- make sure that
is checked, and adjust the line-length parameter if desired
- position the cursor in the paragraph from which you wish
to remove hard returns
- make sure the paragraph has the
Default style (why?)
- do
For some reason, the paragraph is changed from the Default style
to the Text Body style (why??).
- Alternative Find & Replace.
This
AltSearch extension ‘adds many new features to Writer’s find & replace function’,
including searching for character styles and many more things.
As of 2024 Apr 16, the latest version is 1.4.2 dated 2017 Mar.
Despite being old and unsupported, and apparently
somewhat buggy, it has continued to do what I’ve asked of it.
- Multiple views.
Editing or viewing multiple locations in document: use
- Opening WordPerfect files.
LibreOffice 3.5 can open WordPerfect files but Apache OpenOffice 3.4
cannot. Apparently there is an issue with the licence of the
filter (ref)
- Grammar checking.
-
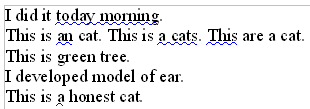 LanguageTool is an
open-source grammar checker that can be integrated with AOO/LO
or used separately. Sentences are parsed and then rules are
applied; rules can be added using either XML or Java. As of
2014 Jul 4, the latest version is 2.6, dated 2014 Jun 30.
Support for 29 languages has been at least started,
with 5 languages (Catalan, English, French, German and Polish) having
more than a thousand XML rules each.
LanguageTool is an
open-source grammar checker that can be integrated with AOO/LO
or used separately. Sentences are parsed and then rules are
applied; rules can be added using either XML or Java. As of
2014 Jul 4, the latest version is 2.6, dated 2014 Jun 30.
Support for 29 languages has been at least started,
with 5 languages (Catalan, English, French, German and Polish) having
more than a thousand XML rules each.
-
 After the Deadline
is a grammar checker developed by
Automattic. Among
other platforms, a
extension for OpenOffice was developed
but on 2013 Aug 29 it was dumped onto Github and is no
longer supported. As of 2014 Jul 4, the latest version
on LO’s extension site is 0.3 (beta) dated 2011 Nov 18.
After the Deadline
is a grammar checker developed by
Automattic. Among
other platforms, a
extension for OpenOffice was developed
but on 2013 Aug 29 it was dumped onto Github and is no
longer supported. As of 2014 Jul 4, the latest version
on LO’s extension site is 0.3 (beta) dated 2011 Nov 18.
-
 Lightproof is a
light-weight language-neutral tool for developing
grammar-checking extensions for OO/LO, written in Python.
There are rule sets for English, Hungarian and Russian.
The latest Debian package contains version 0.4.3 of the
rules for English, dated 2014 May 15.
At one point LO (3.5?) came with LightProof included.
Lightproof is a
light-weight language-neutral tool for developing
grammar-checking extensions for OO/LO, written in Python.
There are rule sets for English, Hungarian and Russian.
The latest Debian package contains version 0.4.3 of the
rules for English, dated 2014 May 15.
At one point LO (3.5?) came with LightProof included.
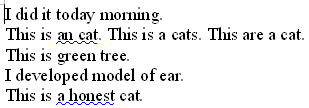
-
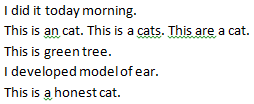 Microsoft Word has a built-in grammar checker. The example
is from Word 2010.
Microsoft Word has a built-in grammar checker. The example
is from Word 2010.
-
 The
Reverso free on-line tool is powered by the
Ginger grammar checker,
for which a free download is available for MS Windows.
The licence of the downloadable software
contains > 8200 words, as well as
spelling and grammatical errors.
The free licence is for a limited time and a limited number
of uses, and possibly limited functionality;
the paid licence must be renewed monthly.
The software communicates with the company’s servers,
requires a user ID and password,
and performs updates without notification.
Once you start the installer, you must accept the licence
to continue but there’s no way not to accept; I was obliged to
use the Task Manager to kill the process.
The
Reverso free on-line tool is powered by the
Ginger grammar checker,
for which a free download is available for MS Windows.
The licence of the downloadable software
contains > 8200 words, as well as
spelling and grammatical errors.
The free licence is for a limited time and a limited number
of uses, and possibly limited functionality;
the paid licence must be renewed monthly.
The software communicates with the company’s servers,
requires a user ID and password,
and performs updates without notification.
Once you start the installer, you must accept the licence
to continue but there’s no way not to accept; I was obliged to
use the Task Manager to kill the process.
-
 SpellCheckPlus
free on-line tool. It is developed by
Drs. Terry Nadasdi (Univ. Alberta) and Stéfan Sinclair
(McGill Univ.).
They recommend their
BonPatron for French and
SpanishChecker for Spanish.
SpellCheckPlus
free on-line tool. It is developed by
Drs. Terry Nadasdi (Univ. Alberta) and Stéfan Sinclair
(McGill Univ.).
They recommend their
BonPatron for French and
SpanishChecker for Spanish.
- Java. During installation,
if it doesn’t find Java on your
computer, you can go and install Java, or just tell it to go ahead
without Java; you may or may not notice missing features as a result.
(Zotero won’t work without Java.)
If you’re using a 64-bit version of OO/LO, make sure you get a 64-bit
version of Java. Using the standard on-line installer may give you
only the 32-bit version. If so, the off-line 64-bit installer can be
downloaded from the
manual download
page.
AOO for Windows is only available as a 32-bit version, and it requires
a 32-bit version of Java
(ref).
- Resources. See
Math Guide.
See also
Reference/Math commands,
FAQ/Formula,
Formula Reference Tables,
and some additional stuff.
- Toolbar icon & quick formula insertion.
There is a formula icon
 that can be added to a toolbar; it is equivalent to
.
(If necessary, right-click on the toolbar and select
to add the icon.)
To quickly add a formula to a document, type the appropriate
math markup codes (e.g.,
that can be added to a toolbar; it is equivalent to
.
(If necessary, right-click on the toolbar and select
to add the icon.)
To quickly add a formula to a document, type the appropriate
math markup codes (e.g., x=y^2) into the document,
select (highlight) the text, and click on the formula icon.
(There is another formula icon
 that is equivalent to
,
for primitive spreadsheet capabilities inside a Writer table.)
that is equivalent to
,
for primitive spreadsheet capabilities inside a Writer table.)
- Numbering.
There is no dedicated feature
for formula (equation) numbering as there is for pages, figures, etc.,
and nothing relevant appears in the menu.
Instead, there’s an Autotext defined for the purpose.
Do , select
and click on . Or type
fn
(the Formula Numbering shortcut) where you want the formula to appear
and press F3. The effect is to insert a table containing
1 row and 2 columns. The first cell contains a formula object.
The second cell contains a text-number field that can be
cited elsewhere by , selecting
= and
=
, and clicking on
.
(For further information:
1,
2.)
See also
Figure and formula numbering by chapter.
- Adding new symbols.
To add a new symbol to the symbol catalogue, while editing a formula do
and click on
.
Select your desired font and symbol,
then type the name of your new symbol
in and select which
to use
(e.g., ).
Set the desired
(standard, italic, bold or bold italic).
Click on .
(Things can get confused if you add a symbol, then delete it,
then want to add it again. In one case I had to edit
registrymodifications.xcu to remove references
to symbol names that I had defined and then removed, to allow
the names to be added again.)
- Spacing. See
How do I change the spacing around my formula?.
(If you use
the
SetMathBorder macro described there,
make sure the formula editor isn’t active when you try running it,
otherwise you may (will?)
get the error message
Property or method not found: getEmbeddedObjects.)
The default spacing before and after formulas can be removed by selecting
(or ),
choosing , right-clicking
and selecting
, choosing the
tab, and adjusting the values for .
- Alignment with surrounding text.
For a long time there was a
problem with the vertical alignment of formulas with the
surrounding text
(bug).
As of version 3.4 there is a new feature:
‘there is a new check-box named 'Math baseline alignment'
available in the 'Formatting Aids' tab of the Writer and WriterWeb
option pages. When this option gets checked then *ALL* Math OLE
objects already existing in the Writer document that are anchored
'as character' (and only those with this anchor type!) will be
automatically aligned to match the baseline of the formula with
the one of the surrounding text. Also new Math objects inserted
later on will be automatically aligned as well. As long as this
option is active manually [sic] movement of Math objects that are
anchored 'as character' is not possible, and thus vertical
alignment in the 'Object' context dialog is now disabled as well.
For new documents this option is set by default.’
(ref)
In my experience, after setting this option in an existing document
it is at least sometimes necessary to double-click on an existing
formula to get it to align properly, and sometimes the alignment
is still not right.
- Vertical alignment of characters within formulas.
There is a
longstanding bug saying that
‘When the numerator or the denominator of the fraction contains
only characters from the Catalog, then the alignment is incorrect’.
One workaround is to add a null non-Catalog character
by adding
{}; for example,
{{}%alpha} over {{}%beta}.
This may be due to a problem in the OpenSymbol font used
by default for such characters in formulas.
- Horizontal alignment within fractions.
To force the numerator and denominator of a fraction to be horizontally
centred, one can put
alignc at the beginning of the formula
(e.g., alignc x = {a over b c}.
This isn’t always necessary, but it is necessary when the fraction includes
quoted characters, such as {"d"x(t)} over {"d"y}.
- Character size in numeric fractions.
The
size
command can be used with an absolute point size or with a relative
size using +, −, *
or /.
For example,
to make the numbers smaller in the fraction \( \frac{1}{6} \), one can do
size *0.6 { 1 over 6 }, reducing the font size to 60%
of the current font size.
- Fonts. When the main font for a document
is changed, the fonts in all of the formulas should be changed to match.
I have created a macro (based on the macro above for changing the spacing)
which sets the fonts to hardwired values in all formulas.
agn01 has a
much more flexible macro. One of its options is to use
the font from the Standard paragraph style; ’Standard’ is the
internal name of the style called Default in English and
Standard in French (ref.).
- Export to .doc. See
TIP : How to convert equations from Openoffice to MS-Word (messages 2007 Dec – 2010 Apr); see also
issue 53223
(2005 – 2011)
- Export to MathML.
If a document is exported
as XHTML then its formulæ will show up as MathML.
For XHMTL export to be available,
the
XSLT sample filter component must be enabled
(ref).
If it was not enabled when OpenOffice/LibreOffice was installed
under Windows,
it can be added by going to , selecting
OpenOffice/LibreOffice, and clicking .
For XHTML export to work, apparently Java must also be installed
and working with OpenOffice/LibreOffice; one way to test if Java
is working is to try
.
- Not full screen.
If, when you start your slide show, it doesn’t take up the
whole screen, go to and under
check that
is selected.
- Use with Zoom.
This assumes that you’re using a laptop with a built-in
camera and an external screen. It is desirable to display the
small version of the current slide, the next slide, the notes,
the Impress in-show controls,
and the Zoom controls all on the laptop’s screen,
so you will be more or less looking at the camera.
- Put Impress into full-screen mode, to avoid inadvertently
displaying irrelevant or sensitive things to the audience.
- In Impress, do and under
set
to
.
- In Zoom, click on ,
select your laptop screen, and
click on .
- In Impress, do (for either the first
slice or the current slide).
- Use with Zotero.
Zotero can’t be used with presentation software in the same
integrated way as with word processors. The easiest way to create
a list of references in Impress is to use
Quick Copy: select items in the middle
column of Zotero and drag them into a text field in Impress
(or into a Writer document and thence into Impress).
To set the format for the copied references,
in Zotero go to .
- Master slides. Even if the master slide has a footer
defined, it won’t appear in slides unless the
checkbox is checked in the
dialogue box.
- Font size. When entering text into a frame,
the font size may be automatically reduced when the amount of text
becomes large.
This may be convenient but it
leads to sloppy inconsistency
of font sizes across slides. To turn off the behaviour,
select the text box and do
(or right-click the frame and select
)
and
check the box .
It’s not clear to me how this is related to enabling the
toolbar and using the
option.
- Blank screen.
If, when using 2 screens, the slide show itself shows up as blank
on an external screen, try going to
and disable .
- Handouts.
The function is not able to
put multiple slides on each page. This can be done by printing to a file,
but:
- Under Windows, Impress sensibly arranges the slides based
on Portrait orientation
of the page but then (at least with CutePDF Writer) the pages are printed
in Landscape mode, cutting off some of the contents.
- Under Linux, the option
produces only PostScript files, not PDF, and some versions of the
Evince document viewer are unable to then print the PS file
as PDF (bug).
An alternative is to use the
ps2pdf command
(part of the ghostscript package).
- Video.
What kind of video formats OO/LO will handle
depends on the operating system and the installed codecs.
I’ve had luck with Microsoft’ AVI format (.avi) under both
Linux and MS Windows.
LO under Linux uses GStreamer to play audio and video.
Using Openshot under Windows 10
(with no additional codecs installed that I know of),
the following behaviour was seen
for a video clip exported with the three available
flavours of AVI, with video profile
VGA NTSC (640x480)
and quality Low:
| Target
| Display when editing
| Play
| File size (KB)
|
| AVI (h.264) |
Icon (film strip) |
Yes |
2,014 |
| AVI (mpeg2) |
Icon (lines + musical note)
| No |
3,039 |
| AVI (mpeg4) |
1st frame
| Bad flicker |
2,800 |
To convert a video file from, say, .mov to .avi,
with the ffmpeg package installed,
the following command works:
ffmpeg -i name.mov name.avi
To make a video clip loop for as long as its slide is displayed,
click on the button
 that appears
on the toolbar that appears
near the bottom of the OO/LO window when a video item is selected.
This doesn’t apply to animated GIF’s, for which the looping behaviour
is defined internally. For some reason a non-looping animated GIF
returns to the first frame rather than staying on the last frame
when finished; a crude work-around is to set a long delay for the
last frame.
that appears
on the toolbar that appears
near the bottom of the OO/LO window when a video item is selected.
This doesn’t apply to animated GIF’s, for which the looping behaviour
is defined internally. For some reason a non-looping animated GIF
returns to the first frame rather than staying on the last frame
when finished; a crude work-around is to set a long delay for the
last frame.
Video files (incl. animation and movie files) are often linked to
rather than being embedded. There does not currently appear to be
an easy way to find out what path and file name are
recorded for a particular item (cf. this bug report).
One possibility is to open the .odp file with an unzip
programme, extract content.xml and search for
occurrences of xlink:href. The paths to linked
files seem to be stored as relative paths (not absolute) so
when copying a presentation to another computer it should be
sufficient to copy the media files with the same relative directory
structure. If the files have not yet been copied when the presentation
is opened in the new location, they will of course not be found;
once they have been copied, I’m not sure what is the minimum that
needs to be done for them to be found. In one case it seemed that
they weren’t seen immediately but that they were seen after one or
two had been explicitly re-inserted from the new location.
In trying to draw box-and-whisker plots, I tried
Advance Office Chart (produced plot but ugly)
and
Boxplots
(nothing happened at final stage when Draw was supposed to be started).
See
LO bug 70361 and
AOO bug 13184.
See also
list of missing chart types.
- SVG.
OOo Draw requires an
SVG Import extension
in order to open SVG files.
- CAD.
CADLO (AKA CADOO.o)
is an extension that adds some CAD-type features to Draw.
It is not currently (2014 May 31) in the extension repository; a new
version (CADLO) is supposedly under development; meanwhile the old
version (CADOO.o) can be
downloaded directly.
Base provides ‘native-support drivers for some of the most
widely employed multi-user database engines’ as well as
‘built-in support for JDBC- and ODBC-standard drivers’
(ref).
As built-in database engines, LO has long had
HSQLDB (written in Java)
and now also has
Firebird (written in C++)
(ref).
| Name | Unicode
value | ⚇ | Keys | Notes
|
|---|
| Dashes
|
| hyphen-minus | 002D | -
| minus
| normal hyphen, cheap minus sign
|
| soft hyphen | 00AD |
| Ctrl+minus
| permit a line break, otherwise invisible
|
| hyphen | 2010 | ‐
|
| non-breaking hyphen | 2011 | ‑
| Ctrl+Shift+minus
| appear as a hyphen but prevent a line break
|
| figure dash | 2012 | ‒
|
| width of a digit
|
| en dash | 2013 | –
|
| em dash | 2014 | —
|
| minus sign | 2212 | −
|
| nice minus sign
|
| There are others; see
http://en.wikipedia.org/wiki/Dash
|
| Space characters
|
| space | 0020 | ▆ █
|
| normal space character
|
| no-break space | 00A0 | ▆ █
| Ctrl+Shift+space 1
| appear as a space but prevent a line break
|
| en space | 2002 | ▆ █
|
| em space | 2003 | ▆ █
|
| three-per-em (thick) space | 2004 | ▆ █
|
| four-per-em (mid) space | 2005 | ▆ █
|
| six-per-em (~thin) space | 2006 | ▆ █
|
| figure space | 2007 | ▆ █
|
| punctuation space | 2008 | ▆ █
|
| thin (five-per-em) space | 2009 | ▆ █
|
| hair space | 200A | ▆ █
|
| zero-width space | 200B | ▆█
| Ctrl+/ 2
| permit a line break, otherwise invisible 3
|
| zero-width non-joiner | 200C | ▆█
|
| zero-width joiner | 200D | ▆█
|
| narrow no-break space | 202F | ▆ █
|
| medium mathematical space | 205F | ▆ █
|
| word joiner | 2060 | ▆█
| Alt-I G B 2
| prevent a line break after a character 4
|
There are others; see
http://en.wikipedia.org/wiki/Space_(punctuation).
-
Was
Ctrl-Space in OOo version 2; now more consistent
with Ctrl+Shift+minus for non-breaking hyphen.
-
These items (with different names) are available in OOo
in the menu if
has been enabled ().
-
Can be used, for example, to permit a line break in a long URL.
-
Can be used after a word at the end of a line,
with a following space character,
to force a line break before the word,
without using a fixed-width non-breaking space
which would mess up full justification of the second line.
This might be used to avoid having a one-character word at the
end of a line.
|
There are various ways of entering these characters into a document.
For example, under Linux, one can copy and paste from the
Character Map application; select
and look under
.
Macros and macro libraries
In LibreOffice, the function is disabled by default. To
enable it in LO 3, do and click on
.
Starting with LO 4, do and click on
; the limitations
apparently include opening or switching between windows, and changing
anything but document contents.
If you export a macro library, it will be saved in a directory which has the name of the library.
That directory will contain an XML file script.xlb which contains a line specifying
the name of the library, plus a line for each module in the library. For each module the directory
will contain an XML file module_name.xba. Each .xba contains
the Basic script for the module wrapped in XML elements and with HTML entities for
certain characters (e.g., ").
I have a module Insert.xba located in
userdir/basic/Fun/
(where userdir is a path
as described below).
The module has the form of one-line subroutines for every special
character that I want, plus a generic subroutine for inserting a string
wherever the cursor is – whether in the main text, a footnote,
a table or elsewhere. The macro does not attempt to identify and
replace text that has been selected beforehand.
Below is shown a sample one-line subroutine for a specific special
character, followed by the generic insertion subroutine.
…
Sub enDash : zzzInsert(Chr(&H2013)) : End Sub
…
Sub zzzInsert(string)
Dim oDoc as Object
Dim oText as Object
Dim oVCurs as Object
Dim oTCurs as Object
oDoc=thiscomponent
oVCurs = oDoc.currentcontroller.getViewCursor()
oText = oVCurs.getText
oTCurs = oText.createTextCursorByRange(oVCurs)
oText.insertString(oTCurs.getStart(),string,false)
End Sub
Further information about macros:
Customizing things
See above re custom icons.
In what follows, userdir
refers to a path which is
different for different OOo versions and for different operating systems.
For example:
~/.openoffice.org2/user/
~/.openoffice.org/3/user/
~/.libreoffice/3/user/ (< 3.5)
~/.config/libreoffice/3/user/ (≥ 3.5,
ref)
~/.config/libreoffice/4/user/
-
C:\Documents and Settings\username\Application Data\OpenOffice.org2\user\
-
C:\Documents and Settings\username\Application Data\OpenOffice.org\3\user (before Windows Vista)
C:\Users\username\AppData\Roaming\OpenOffice.org\3\user (from Windows Vista)
C:\Users\username\AppData\Roaming\OpenOffice\4\user
C:\Users\username\AppData\Roaming\LibreOffice\4\user (for LO 4 and 5)
(Cf. [Tutorial] The OOo user profile.)
To replicate my cusomizations after installing OO/LO on a new
computer or (if necessary) after installing a new version:
- To install my own macros, I copy
Fun/,
dialog.xlc and script.xlc from/to
userdir/basic/
- To install my AutoCorrect Options, I copy
acor_en-CA.dat (and possibly files for other languages)
from/to
userdir/autocorr/
- To install my customized menubar, I copy
menubar.xml from/to
userdir/config/soffice.cfg/modules/swriter/menubar/
- To install my customized toolbars, I copy
standardbar.xml and
textobjectbar.xml from/to
userdir/config/soffice.cfg/modules/swriter/toolbar/
Exit from OO/LO and its Quickstarter before doing the above.
As noted above, the zero-width space (to permit a line break)
and the zero-width non-breaking space (or ‘word joiner’, to prevent a
line break) are available in the menu only if
‘complex text layout’ (CTL) has been enabled.
If OOo acts oddly, the user profile may have been corrupted.
See Resetting the user profile.
R. Funnell
Last modified: 2026-07-29 08:04:42