 Word-processing techniques
Word-processing techniques
Word-processing techniques Select Insert
  Graphics Custom Box.
 In the dialogue box,
select a box style and click .
(For a single box
it doesn't really matter which style you select.) An empty box
appears, and is automatically selected with its eight
handles showing. The existing text wraps around the box by default.
In the dialogue box,
select a box style and click .
(For a single box
it doesn't really matter which style you select.) An empty box
appears, and is automatically selected with its eight
handles showing. The existing text wraps around the box by default.
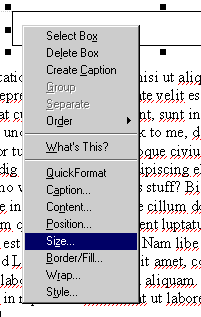 To set the size of the box,
position the pointer over it
and press the right mouse button. From the resulting popup menu select
.
To set the size of the box,
position the pointer over it
and press the right mouse button. From the resulting popup menu select
.
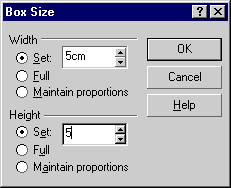 In the dialogue box,
select the
radio buttons for
both and
and specify
the desired values, e.g., 5 cm x 5 cm.
Click on .
In the dialogue box,
select the
radio buttons for
both and
and specify
the desired values, e.g., 5 cm x 5 cm.
Click on .
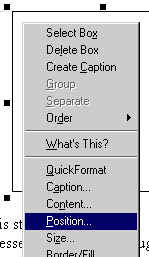 To set the position of the box,
again use the right mouse button to invoke the popup menu
and then select
.
To set the position of the box,
again use the right mouse button to invoke the popup menu
and then select
.
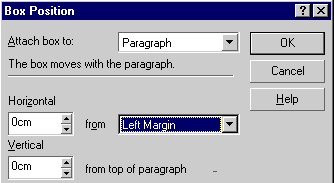 In the dialogue box,
specify the desired position, e.g., 0 cm from the left margin.
Click on .
In the dialogue box,
specify the desired position, e.g., 0 cm from the left margin.
Click on .

Last substantive modifications 2002 Mar 16
Last modified: Tue, 2007 Mar 6 20:32:02
Slide show generated from wp-tech.html by Weasel 2007 Mar 7